Virtual Private Network for a Server Cluster and Workstations with Wireguard
Wireguard is a new VPN solution that will probably be added to the Linux kernel in the near future. According to their own information they “aim to be faster, simpler, leaner, and more useful than IPsec, while avoiding the massive headache”, which judging from my own setup experience with Wireguard and my theoretical experience with IPsec seems to be true.
With Wireguard we can easily setup our own private cluster - without having to buy colocation space or hosting with one of the big cloud computing providers. Of course, since your servers might not be next to each other the latency between your servers will most of the time be higher than with colocation of cloud computing (with cloud computing you can usually choose to have your servers within the same data center).
As an advantage however, we can save a lot of money over cloud providers (if servers are running 24/7) and we can even have better failure resilience if we can run our service across multiple different hosting providers.
Wireguard
To connect our servers into a VPN we first have to install Wireguard. At the
time of writing you still have to install the kernel module manually. In Arch
Linux we can install the kernel module with wireguard-arch and the
command line tools with wireguard-tools.
Once wireguard is installed you should be able to load the kernel module with
modprobe wireguard without rebooting your server.
At first we have to create public and private keys for each host:
wg genkey > privatekey
wg pubkey < privatekey > publickey
With these keys we can then create the wireguard configuration files. Each of the hosts has their own configuration file containing its own private key and the public keys of all other hosts it is connected to. Which topology you use to virtually connect your servers depends on your exact situation. If you only have a few servers, you might want to create a fully connected mesh network (i.e. each host is connected to each other host directly). If you have multiple sites on different continents you might also want to connect them through only one gateway. And if you have a large number of hosts, you might want to create a partly connected mesh network.
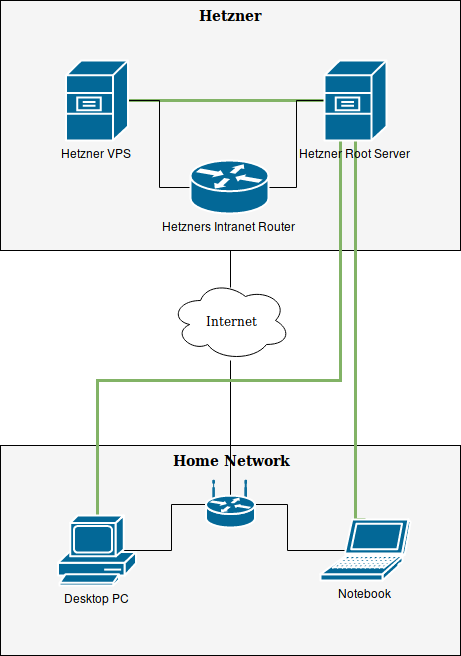
The following image shows the physical setup of my hosts and my client PCs. The bold green line indicates the Virtual Private Network I created with Wireguard. I did not draw other (possibly malicious) hosts on this chart, but of course I am not the only one connected to Hetzners Intranet Router. There are other hosts connected, too, which is why it is not a trusted environment for communication between Hetzner VPN and Hetzner Root Server.
A wireguard configuration file looks like this (and is stored in /etc/wireguard,
e.g. /etc/wireguard/wg.conf):
[Interface]
Address = 10.0.0.2/24
PrivateKey = <host1's private key>
ListenPort = 51820

[Peer]
Endpoint = <host2's real IP>:51821
PublicKey = <host2's public key>
AllowedIPs = 10.0.0.3
This configuration defines that the host on which this configuration file is
stored should have the IP address 10.0.0.2 and the virtual network spans the
IP range 10.0.0.0 - 10.0.0.255 (/24 submask). The host will listen for
wireguard traffic on port 51820.
There is one peer node known to this host at the given real IP address
listening on port 51821. The AllowedIPs field for a fully connected
mesh network will be set to the virtual IP address of the node 10.0.0.3
(i.e. only traffic that goes to the host directly is sent there), but might
be a complete IP range if you use a gateway host. We will see this later when
we setup a client PC to connect to the VPN.
The other host will have the same configuration file with reverse values:
[Interface]
Address = 10.0.0.3/24
PrivateKey = <host2's private key>
ListenPort = 51821

[Peer]
Endpoint = <host1's real IP>:51820
PublicKey = <host1's public key>
AllowedIPs = 10.0.0.2
With this configuration defined you can already start wireguard with the wireguard-tools:
wg-quick up /etc/wireguard/wg.conf
If you run this command on both hosts depending on your firewall configuration you might see an established connection or not.
iptables
To make it reliably work we have to setup iptables to allow traffic on the
wireguard port. Since wireguard is not yet officially announced as secure, I
only allow traffic from my known peer host on the wireguard port.
I will list a full set of iptables settings. If you already have iptables setup you will probably only need the line to “allow connections to wireguard from other hosts”.
iptables -A INPUT -m state --state ESTABLISHED,RELATED -j ACCEPT

# Allow all loopback (lo0) traffic
iptables -A INPUT -i lo -s 127.0.0.0/8 -j ACCEPT

# Allow ping
iptables -A INPUT -p icmp -m state --state NEW --icmp-type 8 -j ACCEPT

# Allow connections to wireguard from other hosts
iptables -A INPUT -p udp --dport 51820 -s <host2 real IP> -m state --state NEW -j ACCEPT

iptables -A INPUT -j REJECT
The same iptables adjustment has to be made to the other hosts.
With the wireguard port now open the connection between both hosts should
work fine and you should be able to ping 10.0.0.2 from host 2 and 10.0.0.3
from host 1.
Road Warriors
One of the purposes of a virtual private network over my hosts also was to be able to hide most of my currently public services (like Gitlab) inside the virtual private network. This will reduce the attack vectors on my server a lot, because I expect services like Gitlab to have quite some vulnerabilities if not kept up to date. By restricting Gitlab to my virtual private network I will remove this attack vector.
To achieve this, we have to connect our desktop clients to the virtual private
network somehow. Since they are not static hosts, we should regard them as
road warriors. The setup will be pretty much the same, except that the hosts
do not know the real IPs of the road warriors (as these will probably change
from time to time) and the clients will have a PersistentKeepalive setting
to keep the connection established and avoid problems with NAT’ing and
the firewalls of ISP-provided routers (which you might not be able to adjust
as wanted).
Again, you have to create keys for the new machine:
wg genkey > privatekey
wg pubkey < privatekey > publickey
The host configuration will get an additional entry like this:
[Peer]
PublicKey = <desktop PC's public key>
AllowedIPs = 10.0.0.100
10.0.0.100 is the virtual IP address of my desktop PC.
I chose to use the IPs starting at 10.0.0.100 for road warriors, but you
can of course use any other IP.
We also have to add our clients IP (hopefully does not change to often) or allow the whole wide world (once wireguard is officially released) to iptables:
iptables -A INPUT -p udp --dport 51820 -s <client real IP> -m state --state NEW -j ACCEPT
On the client you also have to create a wireguard configuration file again:
[Interface]
Address = 10.0.0.100/24
PrivateKey = <desktop PC's private key>

[Peer]
Endpoint = <host1's real IP address>:51820
PublicKey = <host1's public key>
AllowedIPs = 10.0.0.0/24
PersistentKeepalive = 25
Unlike all previous configurations the AllowedIPs field now allows multiple
IP addresses. This is, because we want to connect to host 1 from our client
machine and then be able to reach all servers in the virtual network.
Whenever we communicate with any IP from 10.0.0.0 to 10.0.0.255 now
the IP controller of Linux will send the traffic to host 1. Host 1 is then
responsible for forwarding the traffic to the other hosts.
IP Forwarding
To achieve this we have to adjust our previous configuration of host 1 a bit. We will add commands to execute after the interface came up and after it was taken down. These commands will setup forwarding rules for iptables:
# Already existing configuration:
[Interface]
Address = 10.0.0.2/24
PrivateKey = <host1's private key>
ListenPort = 51820

# New configuration from here:
PostUp = iptables -I FORWARD 2 -i wg -j ACCEPT; iptables -t nat -A POSTROUTING -o wg -j MASQUERADE; ip6tables -I FORWARD 2 -i wg -j ACCEPT; ip6tables -t nat -A POSTROUTING -o wg -j MASQUERADE
PostDown = iptables -D FORWARD -i wg -j ACCEPT; iptables -t nat -D POSTROUTING -o wg -j MASQUERADE; ip6tables -D FORWARD -i wg -j ACCEPT; ip6tables -t nat -D POSTROUTING -o wg -j MASQUERADE
In most tutorial about wireguard you will see the rule iptables -A
FORWARD -i wg -j ACCEPT instead of -I FORWARD 2. This only works if your
forward rules were not setup previously. I already had the following rule
in my FORWARD table as last rule:
Chain FORWARD (policy ACCEPT 0 packets, 0 bytes)
 pkts bytes target     prot opt in     out     source               destination
0     0 REJECT     all  --  any    any     anywhere             anywhere             reject-with icmp-port-unreachable
Appending another rule would have added it after this reject rule and thus achieved nothing. Thus, I append my rule as the second rule.
I am not exactly sure where this rule came from, but I suspect it is created by docker.
Also make sure that IP forwarding is enabled on the host with the sysctl
option net.ipv4.ip_forward:
sysctl net.ipv4.ip_forward
If this option is set to zero, change /etc/sysctl.conf or your
custom configuration files in /etc/sysctl.d/ (if supported by your system).
Once you enable wireguard on your desktop PC with
wg-quick up /etc/wireguard/wg.conf now you should be able to ping both
hosts.
nginx
To restrict Gitlab to the VPN we can either make nginx listen only on the
private network interface or setup Allow and Deny rules. I chose the
latter, because I could not manage to bind nginx to different interfaces for
different virtual hosts and it would also have made certificate requests
from Let’s Encrypt much more difficult. On the other hand, it can be argued
that you should use self-signed certificates for internal services, which is
exactly what I might be doing in the future.
My nginx site configuration files now look similar to this:
server {
    # all my own configuration per service

     location / {
         allow 10.0.0.0/24;
         allow 172.16.0.0/12;  # docker
         deny all;

         # actual configuration for forwarding to gitlab here
     }

     location /.well-known/acme-challenge {
         allow all;

         root /var/www/letsencrypt;
     }
}
This is the configuration file from my own reverse proxy nginx that just forwards traffic to Gitlab.
With this configuration the main service is only reachable from the internal network while the endpoint required by Let’s Encrypt is still reachable from the whole wide world.
I do not maintain a comments section. If you have any questions or comments regarding my posts, please do not hesitate to send me an e-mail to blog@stefan-koch.name.